Building a Trebuchet

Pre Build
The Inspiration
In my homeschool co-op history class we were learning about ancient times. Our teacher gave us an end of the year assignment. The assignment was to pick a person, event, era or other specific topic to become an expert and create a project. I chose medieval siege weapons as my topic, and wrote out 100 questions that I intended to answer. Then I learned all I could about medieval siege weapons and answered the questions, but I still needed to create a project on the subject.
Decision and Design
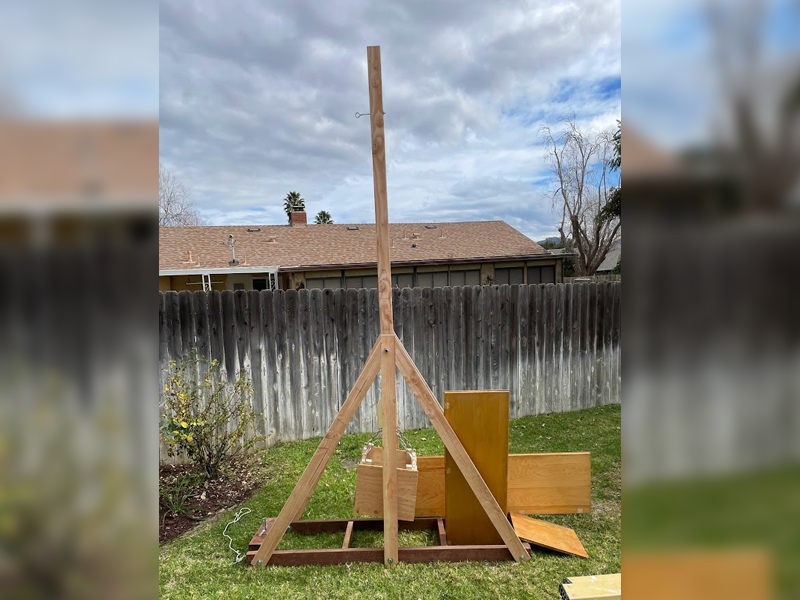
After a lot of thinking I decided that I wanted to build a working trebuchet. In the time before gunpowder the trebuchet was the hardest hitting weapon on earth, launching a two hundred and fifty pound stone over two hundred feet Obviously I couldn’t make a full scale trebuchet; the one I would make would be a lot smaller. With the help of Virtual Trebuchet: A Web Based Trebuchet Simulator I planned out my trebuchet. The main body would be four feet tall and the arm would be eight feet tall. Another thing that made the project harder is that we had to transport it to class. This meant it had to either be small enough to fit in our vehicle or it could be easily disassembled and reassembled.
The Build
A few days later my dad and I took a trip to Home Depot to purchase the materials: wood, screws, and some metal brackets. The next day I started building. First, I had to assemble the sides of the trebuchet; they both had to be identical so the trebuchet wouldn’t be lopsided. Precision was the key. That day one of my friends came over to help with the project. We finished the base and had a little fun with the power tools.
The the base, the sides, the arm and weight, and axle, and the release mechanism parts were almost done, and I hadn't even thought about how I was going to make the sling. I started with duct tape and some paracord that didn’t work well, so I looked up ‘how to make a rope sling” on YouTube and found a great video showing me how to do just that. The only thing left to do on the trebuchet was assemble it and test it.
Testing
As you can probably guess, assembling all the pieces was fairly easy and only took about fifteen minutes. The most fun yet frustrating step was still to be done. Testing and tweaking. Testing and tweaking. We lived a walking distance from a large park with grassy fields. We took our trebuchet out to the field and launched it for the first time. It would be more accurate to say that we tried to launch it. The first time, as we should have anticipated, it didn’t launch the tennis ball we so carefully nestled into the sling. I was disappointed. My dad pulled out his phone so he could take a slow motion video to see why it wouldn’t fire. After lots of firing, observing, then tweaking we finally got it to work perfectly. The next day we brought it to our school in our van and set it up. I showed my classmates the impressive result of many hours of hard and tedious work.
Lessons Learned
-
Ancient weapons makers were amazing.
-
A trebuchet is dangerous… if it catches you in the jaw, your teeth will probably fly into outer space.
-
There is a lot of force in play with the weights and levers.